
Shopify fluid rich text editor - part 1 - call article api
As we want to implement a fluid rich text editor that provides a better experience of writing blog in Shopify, we explored available editor libraries and successfully embedded Lexical's Playground editor in our React project.
The next step is to integrate our React application with Shopify's Admin API to read and write article data.
Admin Link App Extension
Users should be able to open the custom editor from somewhere in the Shopify Admin interface. For that purpose, Shopify provides the so called Admin link. With those, a Shopify extension can insert its links to action at designated places like the top toolbar. In our case, it would be nice if the user has an option to open the custom editor from the article detail view.

Go to your Shopify partner dashboard, select the app to go to the app setup page, and then choose Extension > Create New Extension > Admin Link. Configure your admin link like the screenshot below.
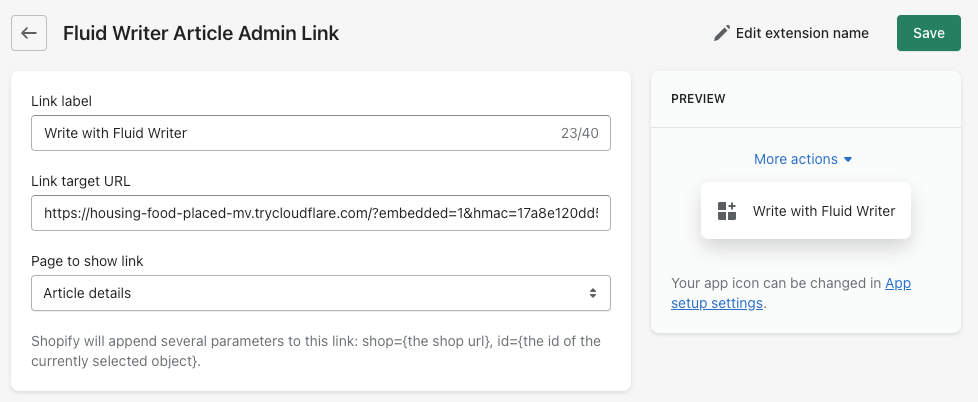
Now, from the Shopify article detail page, when the user clicks on "Write with Fluid Writer", your application will be loaded with the article id passed via url query parameter.
Update Oauth scopes
Shopify application must have Oauth scopes of read_content and write_content in order to fetch and update articles, blogs. To do that, update the scopes attribute in shopify.app.toml file
scopes = "read_content, write_content"Get Article API
Shopify provides a REST api to interact with a store's resources such as Article and Blog. The api is not meant to be requested directly from browsers, probably due to Cross-Domain request restriction as well as to keep the api access key private to the application's owner.
Instead, your application must provide an authenticated api via which the client code can make request to Shopify REST api. To get an article content, we are mostly interested in the Article endpoint.
One hurdle remains. The api requires to know blog_id in order to get an article content, while we only have the article id passed via an Admin Link's query parameter. For now, we are going to get all the blogs of an online store, and then try to fetch an article's data with each of those blog ids. We don't know a better approach yet.
export async function getArticle (articleId, session) {
  const blogs = await shopify.api.rest.Blog.all({ session });
  const result = await Promise.all(blogs.map(async (blog) => {
    try {
      const content = await shopify.api.rest.Article.find({
        session,
        blog_id: blog.id,
        id: articleId,
      });
      return {
        id: content?.id,
        blogId: content?.blog_id,
        bodyHtml: content?.body_html,
        title: content?.title
      }
    } catch (err) {
      return null;
    }
  }));
  return result.filter(article => !!article)[0];
}
Update Article API
Similar to fetching an article, to update an article, we provide our application with an endpoint through which it can send the request to Shopify's REST api.
export async function saveArticle(article, session) {
  const shopifyArticle = shopify.api.rest.Article({ session })
  shopifyArticle.blog_id = article.blogId;
  shopifyArticle.id = article.id;
  shopifyArticle.body_html = article.bodyHtml;
  shopifyArticle.title = article.title;
  await shopifyArticle.save({ update: true });
}
Now after all apis are ready, the next step is to send Lexical editor's html data to the newly created endpoints. We will move on to that step very soon. Stay tuned.